When painting the office, I decided I wanted one wall that was chalkboard paint so I could write reminders for the month on the wall.
Chalkboard paint is actually really expensive to buy and I wanted it in the same colour as my other office walls, so just decided to make my own!
I mixed 2 cups of latex paint with 2 tablespoons of non-cement grouting (that was conveniently left over from when the tile fitters did the kitchen splashbask!) really well until there were no lumps.
I then painted the wall in the same way as the other walls in the office. The key was to make sure it was all covered in a thin layer and not slapped on too thickly.
Once it was dry, I lightly sanded the whole wall with 120 grit sandpaper.
I then "cured" the wall by rubbing chalk all over it and then wiping it off with a wet cloth.
I can now write down what's happening for the month and hopefully not miss another birthday, as I have a nasty habit of doing!
So, now if I look at my wall I've got my half marathon run and then have to call mum to say Happy Mother's Day!
Saturday, March 17, 2012
Table Vase
I saw this great idea on Pinterest and decide to copy it!!
I got given this cupboard from work when we moved into fancy new offices and upgraded all the furniture. It's a good sturdy cupboard but looked very "officey". Here's a before picture as I was just about to start painting it and remembered to quickly take a snap:
I taped off the edges, primed it and then painted it the same blue as the bottom half of my walls. I also gave it a topcoat of varnish as I tend to bash my furnture around a bit and didn't want the paint chipping!
I didn't want so much space taken up on the shelving below with the vase, so used much smaller jars courtesy of a guy from work who eats different sandwich spreads of various interesting colours!
I wanted 3 "vases" as an odd number always looks better somehow, so I measured my cabinet and then made 3 marks evenly spaced.
I drilled into the counter and sanded off any rough edges.
I then drilled though the lid of the jar and lined up the two holes and screwed the jar lid to the underside of the cabinet.
You then just have to fill the jar with water, stick a flower in the hole and you're done!
I also have some pretty fake red gerberas for when I don't have any real flowers on the go!
Wednesday, March 07, 2012
Anyone Fancy a G&T?
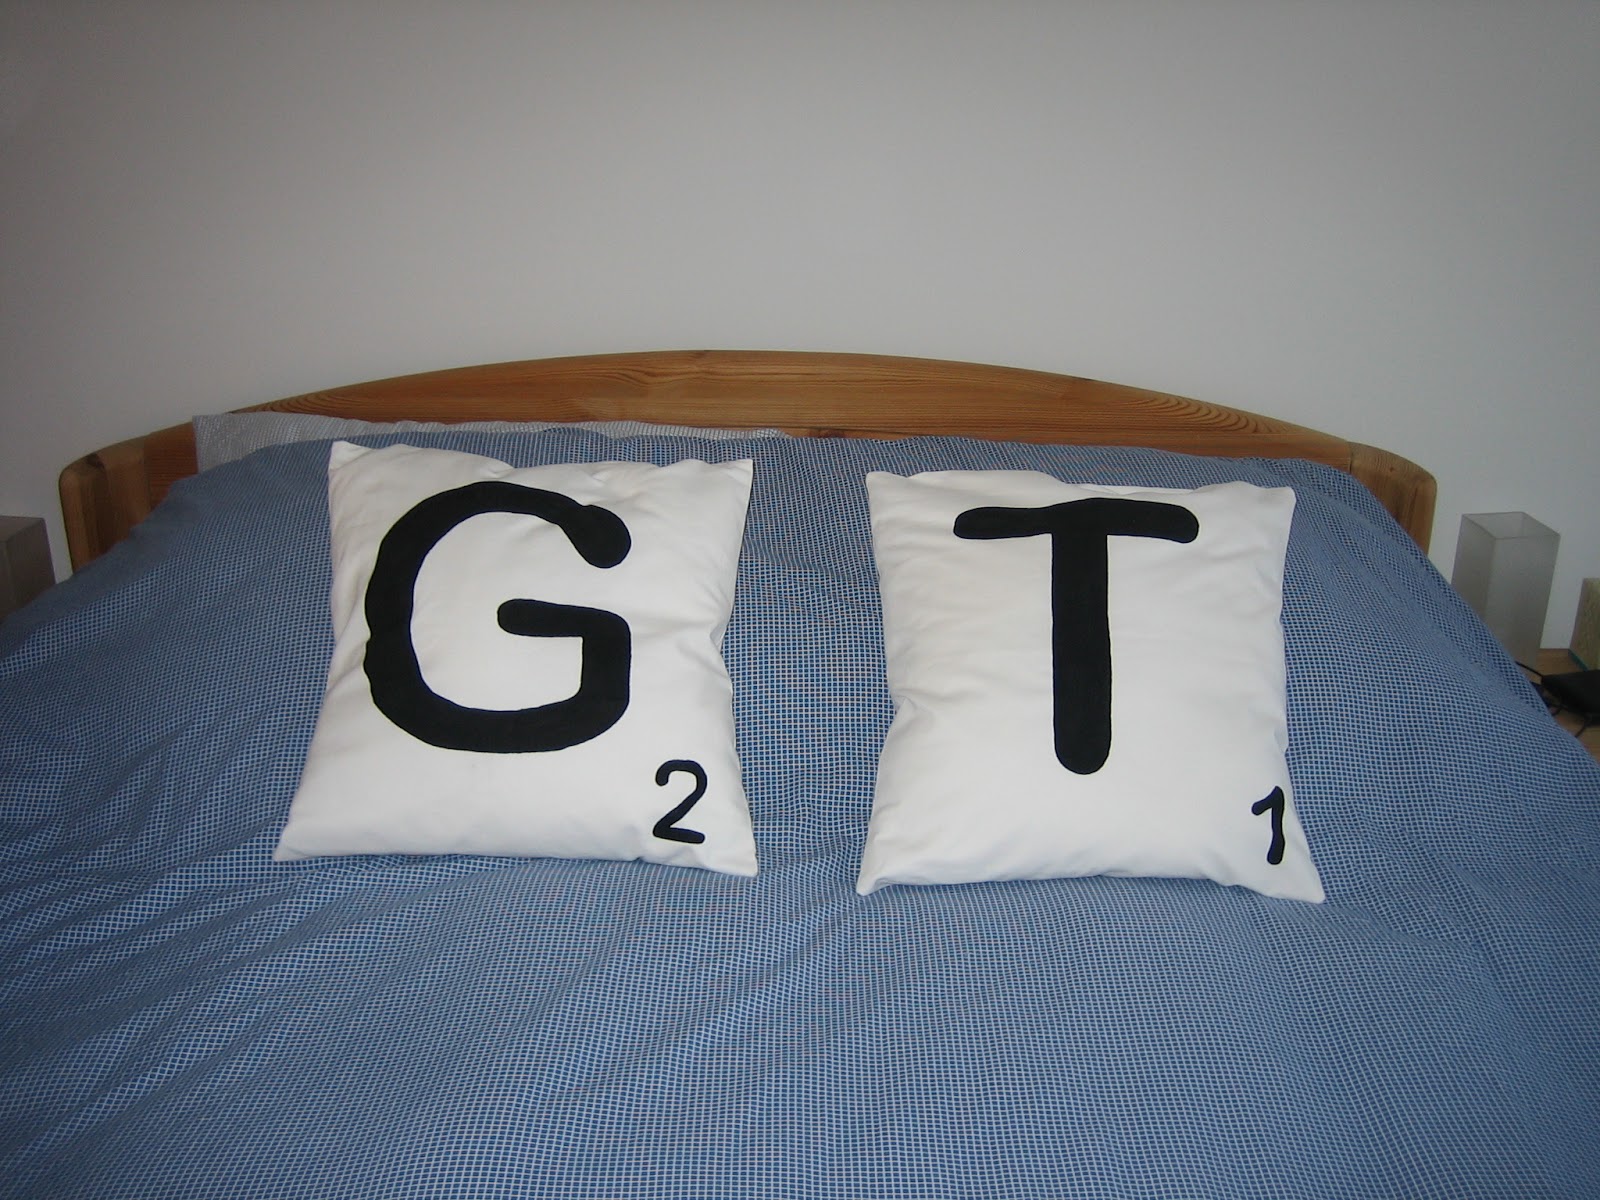
My lovely little brother moved to the big, bad streets of London last week and is now living with 2 uni friends whose names convieniently start with the letters G and T (if that's not a good combo to live with, I don't know what is!). Anyway, I made him some scrabble letter cushions to spell out his name - TOM - for his birthday and he has asked me to make some for his new pals, gin & tonic ... or Greg and Thom as they probably prefer to be called!
I forgot to take any photos of my little creations before sending them to Tom, so this is the perfect opportunity to showcase my work!
I used material left over from our curtains, but if I didn't have this hanging around then I would have just bought a cheap dropcloth from a DIY store to save the pennies!
I wanted the cushions to be 45x45cm, as this is a standard size of most cushions and Scrabble pieces are square!
I cut the material about 48x100cm so I cound fold the hem back and still have room to fit the cushion in.
I then folded the material and folded the hems back and ironed them in place
I then used lockstitch and very slowly went round from the top of one side where the hole for stuffing the cushion is, all down one side until I reached where the material was folded down. I did the same for the other side and was left with a basic cushion cover.
I bought some simple buttons, cut slits in the material and sewed in buttonhole stitch (wondering all the time when I'm going to invest in my first sewing machine!). I turned the cushion cover out so it was facing the right way, made marks where the buttons should go and then attached them.
Now the fun bit...
I printed out scrabble letters to the right size using a great website called Block Posters and inserted them in the cushions.
I then drew the letters and Scrabble points very lightly on in pencil, put a piece of card in the middle of the cushion so the fabric paint didn't leak through to the other side and then painted on the design in black. I sealed the paint by ironing on it.
Hope you appreciate my hard work, Tom!!
Thursday, February 16, 2012
Fabric Paint T-Shirts
Here are two little presents I made for our neighbour's kids:
I bought cheap plain white t-shirts for the 2 year old daughter and 11 month old baby boy (is it just me, or do the sizes look really similar?!).
I washed them first so that the fabric paint doesn't disfigure on the first wash.
I then chose a nice font in Word (Kristen ITC) and printed it out the size I wanted for the front of the t-shirt. I put a piece of cardboard in the t-shirt so the fabric paint wouldn't run through to the other side and also put the printed words in the t-shirt. I then just copied the words with a fabric pen as you could see them through the t-shirt.
For the little girl, I did "Mamas kleiner Engel" (Mummy's Little Angel) and did a pair of angel wings on the back, which I found on Google images and printed out too.
For the little boy, I did "Papas kleiner Teufel" (Daddy's Little Devil) and did a devil's tail on the back.
Once I had done one side and it had dried, I ironed it to seal it and then turned it over to do the other side.
Hope they like them!
Monday, February 06, 2012
Chest-Of-Drawers Makeover
We bought this cheapo chest-of-drawers from Ikea ages ago and it has moved with us into our 3rd new place now. I always think how cheap and ugly the fake wood veneer looks, so decided to pimp our chest-of-drawers! Here's what I did to make this pretty little lady:
I removed all the rubbish that seemed to have been stuffed in there and forgotten about, hoovered out the drawers as they were filfthy and generally gave the whole thing a good wash!
I then primed the surfaces and filled in the big scratch that was on the top! I lightly sanded everywhere to get a smooth starting surface.
I then got into my Dexter kill suit (does anyone else watch that programme?! I love it!) and painted the whole thing a nice glossy white. Unfortunately, G was away on a business trip and I didn't want to lug the chest of drawers downstairs into the cellar on my own (think visions of him coming home to find his wife dead at the bottom of the stairs with a chest-of-drawers on her!) and as it is currently -20°C outside, painting out there wasn't an option either! I don't really seem to be a very patient person, so I just put the protective covering out in the living room and got going. Unfortunately the paint I used is one that has a hardened glossy finish so it's more durable etc. Well, to say there was a slight odour given off is a bit of an understatement!
I used PowerPoint to make a border (which is basically just a hollowed out rectangle and four circles in the corners!) and then printed it out and drew over it onto the drawers and then painted it in black. I drew two little borders on the top drawer so it looks like it's two little drawers.
I went to the DIY store to look for little drawer pulls. Couldn't believe that they wanted €6 per little knocker! Talk about rip-offs! I looked on ebay instead and found these little babies for the same price as one, including p&p!
I primed them and painted them black. Here they are half finished:
It looks so much better than it did! You wouldn't recognise it as an Ikea knock-off, would you?!
![]() |
From nasty, cheap, anyone can buy to... |
Pretty & original! |
I removed all the rubbish that seemed to have been stuffed in there and forgotten about, hoovered out the drawers as they were filfthy and generally gave the whole thing a good wash!
I then primed the surfaces and filled in the big scratch that was on the top! I lightly sanded everywhere to get a smooth starting surface.
I then got into my Dexter kill suit (does anyone else watch that programme?! I love it!) and painted the whole thing a nice glossy white. Unfortunately, G was away on a business trip and I didn't want to lug the chest of drawers downstairs into the cellar on my own (think visions of him coming home to find his wife dead at the bottom of the stairs with a chest-of-drawers on her!) and as it is currently -20°C outside, painting out there wasn't an option either! I don't really seem to be a very patient person, so I just put the protective covering out in the living room and got going. Unfortunately the paint I used is one that has a hardened glossy finish so it's more durable etc. Well, to say there was a slight odour given off is a bit of an understatement!
I used PowerPoint to make a border (which is basically just a hollowed out rectangle and four circles in the corners!) and then printed it out and drew over it onto the drawers and then painted it in black. I drew two little borders on the top drawer so it looks like it's two little drawers.
I went to the DIY store to look for little drawer pulls. Couldn't believe that they wanted €6 per little knocker! Talk about rip-offs! I looked on ebay instead and found these little babies for the same price as one, including p&p!
I primed them and painted them black. Here they are half finished:
It looks so much better than it did! You wouldn't recognise it as an Ikea knock-off, would you?!
Monday, January 16, 2012
Stencil Wallpaper
I came up with the crazy idea of painting wallpaper onto the wall. Glad I only decided to do the little downstairs toilet as it took quite a long time!
I cut out a stencil on card and drew round it onto the wall in pencil.
I then painted the background in blue and the pattern in grey. Here it is half finished:
I painted the frame of the mirror the same colour as the pattern and now declare this room finished!! Am really happy with how it turned out. Just need to get a lavender plant or something instead of the spider plant to match the walls.
I made some little heart-shaped soaps too and my lovely friend, Lyndall, gave us the white candle as a thank you for having her to stay gift. We haven't even lit it yet but because the room is so small, it smells lovely every time you open the door!
Car Park Sign
I've had my first commission for work! My neighbour came round the other day and asked where we got the brilliant "Private" car parking signs in our spaces as she'd been looking everywhere for something similar. When I told her that I had made them, she asked if I would mind making her a couple too and that she'd pay me for them!
I used some scrap pieces of wood, cut them to size, sanded them smooth and drilled in some holes for the wire to hang them.
I then painted them black with chalkboard paint, as it's waterproof.
I printed out a nice font for the sign and then layed them on the wood and drew round them. This left a slight indent on the wood and I just painted on in silver.
I then sealed the letters with some varnish and added floral wire so you can attach the sign to the fence.
Subscribe to:
Posts (Atom)